
Blog
Clubbells and Indian Clubs: Legit Rehab Tools or Passing Fitness Fads?
 |
| For thousands of years Indian Club training has made guys in their underpants way stronger than you are. |
If this is the first time you’ve heard about Indian Clubs or Clubbells, you’re a little behind the curve. They’ve been used as training tools for fighters from all around the world from Russia to Iran for thousands of years. You could argue the case that the club has been around as a weapon and training tool for about as long as the opposable thumb.
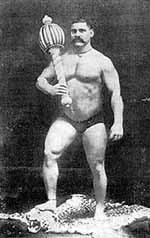
Pehlwani wrestlers popularized club training in India in the early 1900’s. To this date The Great Gama is the only wrestler in history who has remained undefeated his whole life which was substantial, as his career had spanned more than 50 years.
 |
||||||||
| The Great Gama |
Club training clearly worked for Gama. If you are looking to dominate the Pehlwani Wrestling circuit you would be a fool to leave clubs out of your routine. The more relevant question is whether or not this training has a universal application. Are Clubbells merely a fun way to mix up the routine and run the house in obscure Indian Wrestling circuits, or are they useful tools for adding stability to injured shoulders and strength to competitive olympic lifters and kettlebell competitors? I just began working with clubs recently. The following are my initial observations:
PROS
- I’m Not Good At Clubbelling. This is good. Beginers make progress fast, progress that may transfer over to stability and strength in other areas.
- Accuracy- You must be precise when performing a clubbell move. A wrist angle slightly off is amplified by the length of the club bringing an otherwise acceptable snatch crashing down onto your shoulder.
- Grip- In many moves, you are throwing the club away from the body and stopping that momentum with the strength of your grip. This move is called The Mill. When performed with the proper intensity, it replaces an athlete’s hands with what feel like monkey claws.
- Variety- Due to the specific angles that can be created at the wrist with this long lever arm, there are infinite applications and movements to train.
 |
| “The night time is the right time. . . “ |
CONS
- Perhaps due to their perceived Indian roots, many feel compelled to attach a psuedo-spirituality to the teaching and practice of clubbelling. See photo.
Plan:
- Master a few basic clubbell moves that address my shoulder weaknesses (mills, casts etc.)
- Add these moves as a supplement to my typical crossfit training
- As an experiment, compete in a USAW olympic lifting competition and an IKFF Kettlebell Competition in September and see if the clubs lend some universal strength and stability
 |
|||||||||
| If it works for this guy. . . |
Hamstring Strain: Rehab For Rapid Recovery
How do you know if you pulled/ strained/ or tore your hammy? You’ll know. A good sign that you are about to tear your hammy is that your age to strength ratio is out of balance and you are about to play flag football.

Prognosis:
A grade one strain is the most common and is what is usually referred to as a “pulled hammy.” These should still be taken seriously in the first 3-5 days as it doesn’t take much to turn a grade one strain into a grade two, or a grade two strain into a grade three. As a general rule, grade one hamstring strains should be rested from competitive sporting activity for about 3 weeks and grade two injuries for about 4 to 6 weeks. In the case of a complete rupture, the muscle will have to be repaired surgically and the rehabilitation afterwards will take about 3 months.
If you know any athletes you know that these general rules are almost impossible to enforce when there is a game to be played. For that reason let’s explore some techniques to accelerate this lengthy and tedious healing curve.
1) Avoid the Injury:
- Build up to full speed over time when preparing for a max effort sprint particularly when recovering from a hamstring pull. You’ll need 10 minutes of general warm-up before getting serious. An example of escelating intensity post warm-up could look like: 100m @ about 85%, 200m@ 85%, 300m @90% before going 100% on subsequent 400m, 300m 200m and 100m. This scheme would have been a good idea for me a week ago.
 |
| Here’s an image of my right hamstring at the time of this posting. I’m 7 days into a grade II and feeling pretty solid. I’m on pace to return to balistic movements next week. The following is the approach I’m using to get those results: |
2) Rehab the Injury:
- Control inflammation in the first 3-5 days–
- RICE (Rest, Ice, Compression, Elevation) I iced 5-7x/day for 10-20 minute spells
- Anti-Inflammatories- I do not recommend NSAIDs, but I have had success with the topical anti-inflammatory Traumeel. It is better than tiger balm. I know this to be blasphemous among many of my mentholated friends but traumeel is a blend of topical anti-inflammatory herbs supported by research and found to be equally effective at combating inflammation as NSAIDs but with a different mechanism without NSAID’s well documented side effects.
- Avoid inflammatory foods by going paleo for the initial 3-5 days at a minimum.
- High-end your fish oil intake. I went to 4 tbs./day for the first 5 days.
- Reduce muscle spasm– Muscle spasm is a common and painful symptom of a hamstring injury. Because of the trauma to the muscle, signals of contraction are confused, and the muscle may be stimulated.
- Keep the muscle lengthened but not stretched.
- Avoid the seated position as much as possible.
- General soft tissue work can help with both the inflammation and the spasm of an acute strain. We’re not talking deep tissue massage here. I used Graston on mine on days 2-5 by day six I was feeling pretty good. Rather than breaking up adhesions, the goal was to facilitate healing by combing the broken edges back together.
- Other useful techniques are foam rolling and pin and stretch.
- Increase growth hormone and healing factors to your leg by continuing to train vigorously– The hamstring is off limits for a while so hit everything else like it owes you money. This is your chance to break away from those righteous functional movements and indulge in a Jersey Shore-esque upper body jackage fest. Baby oil, while lacking any medicinal or anti-inflammatory properties, is often liberally applied to the arms during and after these workouts. Go ahead and hit those bench presses, those bicep curls and don’t forget the shrugs. For cardio, you can remove all of the sleeves from your t-shirts for time. Enjoy yourself. You’ve popped your hamstring and you deserve it.
 |
| Fist Pump’n Like a Champ. |
What is an Exertional Headache?

The pain of a primary exertion headache is the result of compromised biomechanics in the neck leading to a spasm of the suboccipital muscles that attach the base of your skull to your neck. This results in increased blood pressure in the vessels in the brain and causes a benign but exquisitely intense wave of throbbing pain that can last between 5 minutes and 24 hours.
There are two classes of exertion headaches: Primary and Secondary.
1) Primary Exertion Headaches are the direct result of high exertion and simple biomechanical factors without an underlying pathology. Approximately 3% of the population suffers from benign primary exertional headaches. (Neurology. 1996;46:1520-1524)
2) Secondary Exertion Headaches are exertion headaches that crop up because of an underlying lesion such as a brain tumor or brain hemorrhage. While the vast majority of exertion headaches are of the primary benign variety, sufferers of exertion headaches have an increased rate of intracranial lesions when compared to the general population according to numerous published studies.
If you are having exertion headaches, you would be well advised to have your medical doctor give you a physical to rule out signs of the worst case scenario. Ideally, this would be a physician with a sports medicine background so as to avoid the irritating questions of “why do you lift heavy things?” “Don’t you know that squatting below parallel is bad for your knees?” or “who told you that is how people procreate?”
How to Address Primary Exertional Headaches
When someone presents in my office with an exertional headache I address the biomechanics of the neck with cervical traction, Graston Technique for deep soft tissue work, and a chiropractic adjustment called an occiput lift. Due largely in part to the Crossfit Games Open wod #4, I have had many opportunities to work on exertional headaches lately and this combination gets results.
K-Starr has some handy self care techniques that will keep your symptoms in check long enough to get an appointment with someone who can do some corrective work for you.
Is it safe to continue training with exertional headaches?
To get back to normal training, it is typically the case that you have to lower your intensity levels and go 1-2 weeks without inducing the headache before you can return to normal levels of pain free exertion.
Primary exertional headaches are benign. After getting confirmation from your MD that there’s no underlying cause, it is safe to train with or through the pain. It is however not always possible to continue to train as it feels as though you have been punched in the brain and Trent Reznor has built a nest behind your eyes.
You think Mastodons Used Tubing For Shoulder Stability? Dude, They Didn’t Even Have Hands.
From my many years spent breaking and fixing myself and subsequent years fixing others, this is what I’ve learned:
1) Isolation movements are boring.
2) Things that go unused are not effective.
For these reasons, there is only one simple criteria for determining the single best exercise someone should do: The one that they will perform regularly and with intensity.
Done regularly, with intensity and over a sustained period of time tubing isolation exercises for the rotator cuff might be the world’s best stabilization exercises ever. EVER! The problem is that they are mind numbingly simple and no one has ever EVER stuck with them long enough to be preventative. When the pain goes away, so does the tubing. Look at this image below. Does she look to be having a great time?
 |
| Exactly. |
In your shoulder you want a strong flexible joint, but what the shoulder gains in range of motion, it often compromises in stability. To maintain the balance of stability and flexibility, you’d be well served to use movements that demand both. Enter Kettlebell Conditioning.
I like that Kettlebell movements begin in what is call the Warrior Stance. The humeral head is pulled deep into the socket accentuating the depth and stability of the labrum. This is easy to do but difficult to remember. Stand as far away from a wall as you can and still reach it with your fingertips. Now keeping your arm straight and without pulling your shoulder up toward your ear, draw your hand away from the wall by retracting your arm deep into the shoulder socket. Easy right? Now keep it that way while you perform the following movement:
Could you picture this mastodon rocking hard to 80’s glam rock while pounding his external rotators with tubing exercises? Perhaps he left his medical tubing and his disappointment in the trunk of his car next to his World’s Largest Person trophies and he’s just making do with the Arm Bar in a pinch.
If you own KB’s you already do Arm Bars with the KB you own right? So if this posting is useful for you, you can’t do anything with the information for lack of equipment. Solution?
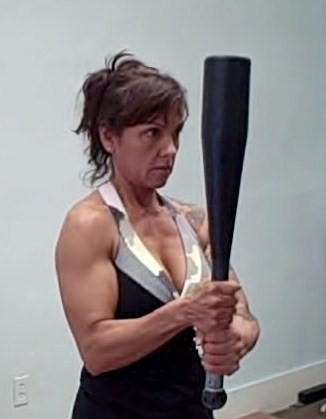
What makes a kettle bell superior to a dumbbell is that the weight is off center. For that reason when substituting a stick for a bell you don’t hold it in the center. The longer the stick the greater the stability demands on the shoulder.
After the press set your arm deep into the socket (warrior stance.) Keep the stick parallel to the floor and at a 90 degree angle to your torso. I do it like this: 3 sets on each side without a rest between, just a reset period as you saw above in The Arm Bar clip. The time spent in the position is determined by the weight you use. Stay there for several moments beyond your comfort level and rest when it begins to wobble and sway.
If it takes several minutes to get to that point of fatigue, it is time to make a change. 3 arm bars + 1 Turkish Get Up followed with 2 more arm bars all on the same arm before switching to the other side. That should do the trick.
The Arm Bar isn’t the only thing out there but it gets results because it’s a challenging functional movement that pushes stability demands and flexibility limitations in the same movement. Before the next time you sit down to dutifully knock out a long cycle of elastic band rotators ask yourself:
“What would a mastodon do?”
 |
| WWAMD? |
Rhodiola and Adrenal Fatigue
 |
||||
|
Being a Viking can be stressful.
|
 |
|||
| Freedom hating is demanding on the adrenals. |
A life well lived can be pretty stressful. Most of the people that I know like to drink lots of coffee, lift heavy things, and procreate. All of these activities are demanding on your adrenal system. When your lifestyle demands more stress hormone then your adrenal glands are able to provide, you run at a deficit which manifests in the symptoms of Adrenal Fatigue.
Symptoms include:
Mid line weight gain, fatigue, difficulty sleeping, difficulty concentrating, reduced sex drive and other upleasantries.
They used adaptogens such as Rhodiola that’s how:
“Rhodiola has long been used in traditional medicine, primarily in Russia and Scandinavia. The Vikings used rhodiola to enhance physical strength and endurance, and it was commonly used by many Northern peoples to treat fatigue, poor physical endurance, nervous system disorders, and infections, and to enhance fertility.”(1)
USES:
Rhodiola has been shown in studies to improve cardiovascular performance by reducing perceived exhaustion and by improving the cardioprotective capacity of lung tissues in hypoxic environments.(2,3) Decrease lactate levels and skeletal muscle damage due to prolonged exercise(4,5.) Rhodiola has long been used for treating the perceived effects of stress and anxiety as well. This is not the sort of supplement that I have used on a maintenance basis as I do fish oil or vitamin D. An early study showed decreasing cardiovascular returns with prolonged use but more recent long-term trials have showed continued benefits with chronic use. (4,5)
WHEN TO USE IT
You don’t have to wait until you suffer overt symptoms before you supplement. I start to consider this supplement when I’m training hard and I start to wake up at 2am.
HOW TO USE IT
Rhodiola has a more stimulating effect at lower amounts, and a more sedating effect at higher amounts. In medical treatment, the usual amounts taken are 200 to 600 mg per day of a standardized extract to at least 3% rosavins and 0.8 to 1% salidroside. The nonstandardized amount would be 1 gram three times daily of the root, the amount for the alcoholic extract (40% alcohol) is 5 to 40 drops two to three times per day (with a weight to volume ratio of 1:1 to 1:5 ). Rhodiola is usually taken before meals.
 |
| Golden Root, Rhodiola rosea, Roseroot |
Visualization and Mental Practice- Take Off Your Shirt and Charge Around Like You Are On Fire. The Wold Cup Goal Will Be Soon To Follow.
My first experience with mental training came in the second grade. I was at recess playing my first game of rugby. We were uncertain of the rules and it took me only 10 minutes to find a way to break my collar bone. Clavicle fractures are common and pretty painful. Where the x-rayed clavicle once held smooth margins it was formed into the shape of a jagged X. I wore a butterfly brace and initially a sling too. After a couple of weeks, the orthopedist called my parents to schedule a time for me to come into the office and begin moving the arm again. My parents were delighted to tell him that I wasn’t available because I was on the mound pitching for my little league baseball team.
My parents love that story. They take full credit for my rapid healing due to the fact that they had me practice a healing visualization each night as I went to sleep. As I remember it I pictured a video game similar to Centipede where I blasted bits of material into the cracked bone.
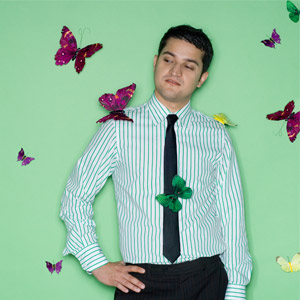 |
| An example of an effective visualization for manifesting butterflies. |
The world is full of successful people who have built empires or defeated diseases who will tell you that positive visualization was pivotal to their success. If you think the guy in the picture above got where he is today without some solid mental practice think again. Bill Starr recently published an article detailing the techniques he successfully implemented in competitive olympic lifting for decades. Now that he has retired he continues to use these same visualization techniques every night to prepare for for running errands the next morning. That may appear a little OCD for most people who would rather being doing instead of visualizing but does it really work, and if it does why?
The overwhelming majority of research on the topic of mental imagery/ mental practice is supportive and is statistically relevant. From healing times in stroke victims,(1,2,3) burn victims, (4) depressives (5) to performance based outcome measures,(6,7,8) mental practice has been well studied and its utility validated.
Based on these studies and many others we could say that Mental Practice “works,” but research is never very good at explaining why something works. For that, you have to turn away from the measurables of research labs and into the touchy feely world of metaphysics and philosophy.
Visualization is a skill that improves with practice. There are many different approaches and step by step models to follow that all basically revolve around visualizing yourself accomplishing a task with as much detail as is possible without getting distracted during the process. Techniques involve engaging as many of your senses as possible to effectively create the scenario and engage your nervous system.
It was proposed by Geshe Michael Roache in The Diamond Cutter and in popular New Age films such as What the Bleep Do We Know, and The Secret that any technique can work but only if it effectively convinces some part of your conscious or subconscious mind that the event visualized actually occurred. This establishes a pathway and a neurological precedent that the body can use and replicate. Proponents of this theory would tell me that the reason why my Centipede visualization sped my clavicle recovery was because during those visualizations I effectively tricked myself and “felt” as though I was healing faster giving my body no alternative but to go ahead and heal faster.
Also at work here is an idea that the physical world or objective reality is the construct of our internal subjective experience. Have you ever noticed that some people have it easy because things always turn out well for them? This idea proposes that it’s the other way around.
The take home here is not the old “Fake it til you make it.” The intent of which statement is to mislead others about your success until you eventually embody that success. Instead, the goal is to “Fake it in a way that some part of you believes it.” The point is to manipulate and mislead yourself so that you will get out of your own way. Still lost? Try this out. To manifest a successful visualization you simply skip the struggle and go straight to the celebration. Here is an example:
Only suckers wait for objective reality. Fire your kids’ soccer instructor. The four step process of scoring a game winning goal in the 2014 World Cup is simple:
1) Remove Your Shirt.
2) Throw Said Shirt Into the Stands.
3) Run In Circles As If Engulfed In Flames.
4) Wait for objective reality to conform to this otherwise irrational behavior.
1-http://www.ncbi.nlm.nih.gov/pubmed/21073100
2-http://www.ncbi.nlm.nih.gov/pubmed/20022993
3-http://www.ncbi.nlm.nih.gov/pubmed/19608100
4-http://www.ncbi.nlm.nih.gov/pmc/articles/PMC2502071/?tool=pmcentrez
5-http://www.ncbi.nlm.nih.gov/pmc/articles/PMC2672052/
6-http://www.ncbi.nlm.nih.gov/pubmed/16368636
7-http://www.ncbi.nlm.nih.gov/pubmed/20508474
8-http://www.ncbi.nlm.nih.gov/pmc/articles/PMC2525972/
$1 Chinese Food

Does this sign look familiar? It does to me. It resides just South of Tacoma by Fort Lewis. You know that overpass that always has yellow ribbons flapping from it and Support Our Troops picketers? That’s the one. Any seasoned traveller of I-5 between Seattle and Olympia is familiar with this disheveled sign and wondered just how far one dollar goes on exit 119. This blog is not typically a restaurant review but I’m making an exception for this Northwest landmark.
I attended undergrad at TESC in Olympia, Washington and played for a rugby team in Tacoma at the time. With my practice commute alone, I’ve driven past this promise of sketchy frugality hundreds of times but I never considered it a legitimate piece of advertising. Until recently, I thought of it as part of the landscape like the Tacoma dome, or the really bright sign in front of the Emerald Queen Casino. My parents live in Olympia and my little brother is in Portland so I still drive past this sign regularly enough to get me wondering if this offer is legit.
This holiday weekend, with our bodies and minds still polluted with the trappings of yuletide spirit, my little family and I ventured to see just what $1 buys South of Tacoma.
 |
| Jackpot. |
I was surprised to see that the Wok In Wok Out was open to the public much less busy but it was both. The $1 Chinese Food sign implies the sketchiest Chinese Food Restaurant in history complete with a murky fish tank and red dank carpeting. In reality, Wok In Wok Out was a more like an Asian taqueria. Everything on the menu isn’t $1, but for $6.14 the whole Pond family left satisfied. Disregard the pained facial expressions below. We are a solid 48 hours out and we appear to be clear of any volatile GI symptoms.

Thrive Under Pressure: Recover Rapidly.
This posting is designed to help a group athletes out of Crossfit West Seattle in their upcoming Caliber Cycle. These recommendations are general and are applicable to supporting recovery from any high intensity training cycle. This is the 4th Cycle that Zach at CFWS has run this year and we’ve learned a lot about how to get the most out of our efforts. Most importantly: Recover rapidly, Don’t get hurt, and Don’t get sick.
Everyone will have their own goals for the end of this cycle but the key is recovery and the path there is the same:
- Fuel Recovery
- Control Inflammation
- Prevent Injury
- Don’t Get Sick
Whether you hope to gain or lose weight in this cycle it is important that you increase your caloric intake. If you wish to lose weight then you are in the right program. Adding a few pounds of skeletal muscle over the following 6 weeks will increase your metabolism. Remember that calories are a measurement of energy. You are planning on expending a lot of energy and you plan to recover quickly, so it is wise to plan on consuming a lot of quality calories. The calories you consume will not cause you to grow. They will pass through the following hierarchy:
- Fuel Your Efforts in the Gym
- Fuel the Recovery From Your Efforts
- Fuel Adaptation/ Strength Gains
- Fuel Growth
Many people who are afraid of “getting too big” only satisfy the first requirement and risk injury because they lack sufficient energy to recover and continue training without injury. A simple way to increase your calories is to add something with a high caloric density such as nuts, avocados, olive oil, or a post-workout concoction of milk and protein powder. For those of you who wish to add an alarming amount of volume to your stature, it won’t be easy. You’ll have to eat in a way that is extreme and uncomfortable. A wise man named Scotty once told me “The meals should be harder than the wods.”
2- Control Inflammation/ Advil is not a vitamin.
Inflammation is not the enemy. Inflammation is the initial step in the healing process. It would be a mistake to rely on NSAIDs to suppress the pain of inflammation. NSAIDs weaken your joints leaving you susceptible to injury. Chronic consumption of NSAIDs often leads to serious gastric and kidney problems.
Instead relying on NSAIDs, control inflammation with:
Fish oil– That’s right. Lots of it too. The guidelines in this link are extreme but if you are ever in your life going to take a high volume of fish oil, now is the time. Buy it. Then drink it.
Contrast Therapy- Several minutes in barely tolerable heat and going right into shockingly cold water. The occasional rest day at Banya 5 or the Y are easy ways to get this done. After a series of particularly heavy training days make your tub into an Ice Bath and submerge your whole body to your chin for 5 minutes. This constricts your capillaries and hastens recovery. Its also strong immune support. For a convenient alternative simply alternate your shower hot 2 min/cold 2min for three cycles.
NSAID alternatives- When you’re looking from the relief that you typically get from NSAIDs, try proteolytic and digestive enzymes. They speed the inflammation and healing process instead of suppress it.
Don’t Get Sick and While You’re Up, Don’t Get Hurt
It is well documented that the immune system can be suppressed during periods of high stress and intense training. There is evidence that supplementing Vitamin C with bioflavinoids during periods of intense training decreases the frequency of upper respiratory tract infection. A gram/ day of Vit C is enough to keep you well. Make sure a that your supplement contains at least 500 mg bioflavinoids though. Without this important co-factor, your vitamin C levels may actually drop due to poor binding and competitive inhibition of your food based Vitamin C intake.
There is some evidence to support the claim that supplementing the minerals Zinc and Magnesium during intense training cycles prevents hormonal imbalances and the resultant over training symptoms of fatigue and malaise. The dose used in this study was 3mg/kg body weight/day. Zinc is an excellent supplement for preventing and fighting upper respiratory infections anyway which makes it a quality supplement to use anytime you feel you may be close to your training threshold. Just be sure to have something to eat first. Zinc supplements on an empty stomach deliver a “rowdy tequila bender” level of nausea.
4- Prevent Injury
Everyone will experience some physical discomfort during this cycle. It is normal for muscles to get sore after a hard workout. It’s not always necessary to “listen to your body” because your brain will often misinterpret terrible and glorious things like Fran and 400m sprints. “Help. Stop. Take a break. You are killing me.” It is an important skill to filter these false alarms and recognize true warnings of impending injury.
Now is the time to get proactive about the weak links in your kinetic chain. You know your spots: shoulder, elbow, wrist, back, hip, knee, ankle- address your weaknesses. Mobility issues in any of these joints will be exposed in the basic olympic lifts. Make it a priority to get to class early and spend 5-10 minutes improving your range of motion. The MWOD has dozens of quality mobilities for the major movements that we’ll be implementing. Supplemental therapies such as ART and Graston are sometimes necessary to make progress in areas with a history of injury.
Summary: There you have it. It is easy to thrive under pressure: Recover quickly, don’t get hurt, and don’t get sick. Contact me with any specific questions regarding recovery and supplementation. Have a great cycle.
Conditioning for Parents aka- Rough Housing for Time
AKA Burn your Ergo Pack.

Most great gyms (the ones with the stank of chalk and glory) don’t have child care facilities. Even if you were fortunate enough to find a Chuck E. Cheese/ Barbell Club hybrid, most parents are typically way too busy to make the time for such an oasis. For all of you parents who don’t have time to get to the gym, this series of postings is for you. While all the rest of us suckers have to pay money for resistance equipment, you clever procreators made equipment from your own DNA. Well done. Now put it to use.
Here are a few ideas that my two rowdy boys (Finley and Sullivan) and I use around the house. Please feel free to expand on these with your own moves and for God’s sake share those ideas below in Comments.
EQUIPMENT:
I have a back yard trampoline which makes several of these moves far safer, more fun and more challenging. This first posting will focus on trampoline workouts. There will be other sorts to come.
Tackle the Team. With children of the right temperament, you wouldn’t believe what a burner this one is. In my family it rivals the WOD Karen in suck factor.
First: Place three small mammals on a trampoline and zip yourself in there with them. These mammals would preferably be children and would preferably be your own. (If you lack the requisite offspring, borrow some from your neighbor.)
Next: Attempt to tackle all 3 mammals AT THE SAME TIME. This gets very challenging when they learn to spread out and to get up quickly after being brought down. If one is back on its feet by the time you bring down the third, you missed that rep. It is sometimes necessary to resort to threats of spankings if they don’t hold still. This is undoubtedly underhanded cheating, but a great man once said “If you ain’t cheating, you ain’t trying.” When using this underhanded technique lengthen the WOD to a 20 minute AMRAP to keep it RX’d.
Person Toss. This one is pretty straight forward. Take three warm up bounces before heaving your precious offspring into the heavens and trust your parenting instincts to kick in as they come hurtling toward you. Work up to max effort height gradually. If they get spooked by the abrupt height they will likely flail a sharp elbow into you nose. I catch them under the arm pits and set them aside and grab the next one. This could be performed like Karen (150 for time) but I prefer to treat each toss as a single rep attempt at max height.
Stay tuned for future installments which will cover the following movements and more: Sully and Fin KB swing, People Turkish GU, Child Zerkers, Mammal Front Squats, Finley Thrusters, Over Head Sully, Walk on Dad While he does plank, Burn Your Kelty AKA Farmer’s Walk, Offspring Pistols, Etc.
Graston Technique: Hard Tools for Soft Tissues

I was in a Graston lecture last weekend when a friend named Dan who is facing knee surgery texted me these probing questions: “What is Graston Technique? Have you had it done? Does it Work? How does it work? How is it different from things like Foam Rolling?” These are pretty good questions and deserve a better answer than my somewhat terse response: “Foam rolling is great, but good luck getting a roll of foam between your femoral condyle and your torn meniscus.” As a favor to you Dan I’ll expand on that answer here.
 |
| Gua-Sha uses Horns, Bones, and Stones |
 |
| The instruments have specialized design features which accommodate the shoulders, elbows, wrists, knees and ankles which make them ideal post-injury and post-surgical tools. |
Lumbar Disc Herniation

It is common for people to wonder if they have a herniated disc in their lower back when they feel pain radiate down the leg. There are several differential diagnoses that must first be ruled out before that conclusion is made. The only way to confirm a herniation diagnosis is with an MRI but a good physical and neurologic assessment is often enough to determine the cause of lower back pain that refers into the leg. If you are wondering if you are suffering from a herniated disc in the lumbar spine and you want to know what your options are, this posting is for you.
- Sudden onset of lower back pain with severe pain down the leg possibly beyond the knee.
- The leg pain may be more severe than the back pain.
- Pain may result from heavy lifting, twisting or repetitive stress trauma.
- The leg pain is described as “electrical”, “sharp” or “shooting.” The pain follows a dermatomal pattern determined by the spinal level of the herniation as pictured below.

- The leg pain is worsened by increases in intra-disc pressure: coughing, sneezing, weight bearing, and positional changes that involve forward flexion of the low back and at the hip.
Additional findings: Dermatomal numbness/ decreased sensation, weakness, decreased reflexes.
- Age 25-45 this is when the nucleus is most hydrated
- male >female 3:2
- Prevalence: 1-3% lower back pain cases
- 95% of lumbar herniations occur at the L4-5, L5-S1 levels
Differential Diagnosis
- Piriformis/sciatica- Sciatica feels like a disc herniation but it is not. Sciatica is when the sciatic nerve is entrapped distally from the spine, typically by a muscle such as the piriformis. This still presents with pain down the back of the leg to the foot and is best treated with chiropractic manipulation of the sacrum and soft tissue work on the piriformis muscle.
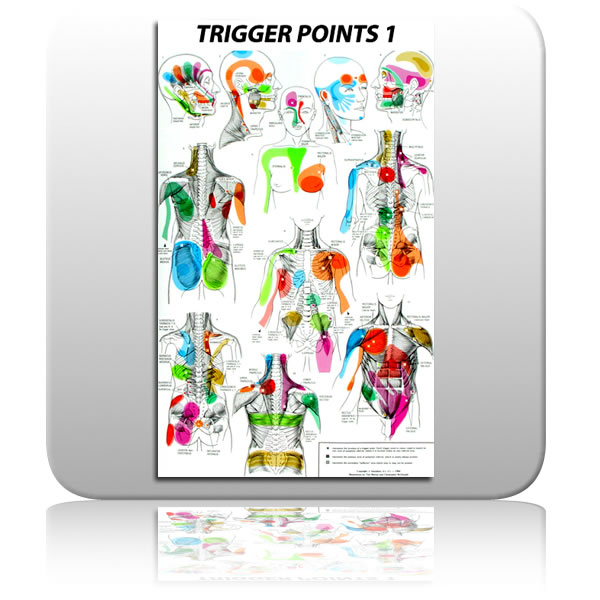
- Myofascial Trigger Point- A trigger point is a small region within a muscle that refers pain distally. They are easily treated with trigger point therapy involving light repeated pressure into the source muscle. The source of this referred pain can be quite a distance from where it manifests as is illustrated in the trigger point map pictured below. Acupuncture also has very effective treatment strategies for trigger points.
- Acute hamstring spasm or strain must also be ruled out as a possible source of sharp pain down the back of the leg.

- Lower Cross Syndrome: A postural shift toward anterior pelvic tilt caused by imbalanced forces across the hips as pictured below. Weak abdominals, a tight lower back, and tight, weak hamstrings and glutes result in excess pressure on the posterior disc fibers.
- Lack of exercise/ poor general health and nutrition. This is why I promote vigorous physical activity with my patient population. I encourage my patients to learn how to safely move very heavy weights and to practice those motions regularly.

Conservative:
Cauda Equina Syndrome presents with saddle parasthesia and urinary retention. It is an emergency situation. Care of all presentations except Cauda Equina should begin with conservative care.
Conservative care of a disc herniation is the non-surgical and drug free route. Except in the case of Cauda Equina Syndrome, this is where all initial care should begin. It involves mobilizing the vertebrae to accomodate the return of the disc material out of the intervertebral foramen. In chiropractic, several techniques are used including Flexion/Extension, The McKenzie Protocol and Chiropractic manipulative therapy. Yes, it is safe to adjust a spine with a disc herniation. It is infact the standard of care. [2] [4] An estimate of the risk of spinal manipulation causing a clinically worsened disc herniation in a patient presenting with lumbar disc herniation is calculated from published data to be less than 1 in 3.7 million. [1] Alternative conservative care modalities include Massage, Acupuncture, and physical therapy.

Surgical:
This is the best option with acute Cauda Equina Syndrome, and is the last option when progressive neurological deficiencies are present during the course of conservative management. That means you are doing the exercises and being adjusted but you continue to digress measurably with loss of muscle strength, tone, and reflexes. Surgery is also the preferred treatment option in cases of sequestration of the disc material into the spinal canal as pictured above. This is a last resort in care because of recent reviews of the literature that reveal even in successful spinal surgeries, the benefits are short-lived and are indistinguishable from conservative outcomes on an 8 year time line. [3] I nearly placed photo of a lumbar surgery in progress here but after the achilles shot last week, I thought that might be too much. For the curious in the group, click here for link to a short youtube video. When going through these videos I found the most interesting part to be the comments left by viewers. They all have had the procedures themselves and they are a solid random sampling of outcomes that reflect a hit and miss level of relief.
Recent MRI studies of asymptomatic populations find that as many as 52% of asymptomatic people have lumbar disc bulges and hernitations! [5] The difference between a benign asymptomatic lesion and a debilitating one is likely your personal biomechanics and how you use your spine day to day. Because of this, the best way to treat a symptomatic disc herniation is to avoid one. An assessment of the biomechanical forces that your lower back is exposed to both statically and with your lifting technique will have you on the right path. If it is too late for that and you already present with symptoms, beginning a course of conservative care now will typically result in 50% improvement in symptoms within the first 3 weeks of initiating care.
Achilles Tendon Injury
Injuries to this part of the body go by many different names depending on location and severity of injury: Achilles rupture, achilles tendinitis, achilles tendinosis, tennis leg, gastroc strain, soleus strain, the list goes on but I will refer to the rupture of a lower leg tissue generally as an achilles strain from here on out. The purpose of this post is to help the reader avoid ever having this injury by recognizing risk factors and developing skills that neutralize those risks.
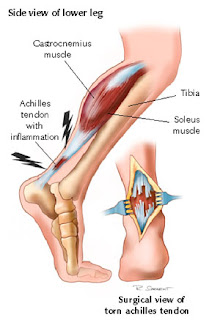
The achilles tendon is the largest and strongest tendon in the body. It can sustain a tensile load of 1 ton. That is the weight of a VW beetle. Despite it’s inherent strength, it remains the second most frequently torn tendon in the human body. The achilles is as substantial as it is because it is made to withstand the dynamic stress of an eccentric load. What that means is that when you jump and land on your toes, the gastrocnemius contracts to slow your heel from hitting the ground at the same time that it lengthens to accommodate dorsiflexion at the ankle. That makes the achilles tendon a rope in a powerful tug of war. When you gain strenth, weight, or increase work load rapidly, you run the risk of out pacing the relatively avascular tendon’s ability to adapt resulting in pulling it apart with your own body’s forces.
Because of the inherent strength of this structure, it is unlikely for it to tear or rupture when it is healthy. It is far more common for a previously inflamed gastroc-achillis complex to give way to a major tear. This is a peculiar tissue that runs when it is torn, much like a piece of paper with a small tear in it- pull on both ends and you’ll soon have two pieces of paper. Athletes are used to performing through discomfort and pain and rarely take the necessary steps required to avoid an impending tear. Most of the successful athletes that I know don’t “listen to their bodies.” They have another chain of command where their bodies do as they are told. That being said, have a look at the wrecked tendon below. This is what was left of my older brother’s achilles after he blew it out in a basketball game. He played through the pain. He went to the gym the next day! He didn’t get in to have it looked at for 3 days. I love him, but he’s a big dumb animal. Don’t be a big dumb animal.

Know when you are vulnerable:
There are 3 major ways that you may be vulnerable to an achilles injury right now.
1) Demographic:
Are you an athlete between the age of 25 and 40?
Have you recently gained weight or increased your strength?
2) Achilles Abuse
Do you like to train cold? Take off from a stop to a sprint? Do you do workouts with rapid repetitive jumps? Do you frequently run on the road? Are you experimenting with barefoot running?
3) Previous Injury
Are you sore and tight above your heel when you first wake up in the morning? Does it wear off as the day goes on?
Have you noticed any swelling making one calf muscle appear larger than the other? Remember it doesn’t have to be painful.
Have you noticed a “twang” in that area. The day after a REALLY long run I felt the sensation of guitar strings being strummed in my achilles followed by them being cut one by one. I iced it and steered clear of dynamic training for a week.

This injury can still be avoided even if you meet several of the at risk criteria above:
Be Proactive:
Listen to your body- I know. You don’t want to but when your body speaks from your lower leg you listen. When your lower leg hurts even a little, ice it and give it space.
Warm the area. I don’t mean “warm up.” Waving your arms and crunching your core won’t warm your achilles tendons. Use the muscle before you stress it and for God’s sake don’t warm up with double jumps or you’re asking for trouble.
Make gradual progressions- The 10% rule is a conservative way of extending your distances by 10% per outing.
Train on diverse surfaces- Consistently running forward on pavement will overwork the mid line structures of your lower leg.
If you are experimenting with the idea of bare foot running, do it step by step- Losing the heel you’ve had you’re entire adult life places an additional 1/2 inch stress on your achilles/gastrosoleus junction.
Stretch the gastroc statically post work out and throughout the week- This can be done with simple moves such as down dog but I like this wall stretch posted to MWOD last month. The guy (K Starr) yammers on for 3 minutes before he gets down to it, but there is a quality mobility in the end:
Keep in mind that the gastroc is part of a larger fascial plane that runs from the bottom of your foot to the origin of your hamstring at your ischial tuberosity. Maintain global range of motion all the way to the toe by working a ball into the base of the foot while you are at your desk.
Summary:
If you injure your lower leg it is typically all or nothing:
All- you feel like you’ve been kicked, hit, or shot in the back of the calf. You will probably even turn around to see who did it. It may hurt a lot as in a 1st or 2nd degree tear, or it may only hurt a little as with a total rupture which can be less painful due to the nerve damage. Either way, it will probably swell and a palpable lesion may be present. Tape your ankle into plantar flexion and get to a sports medicine doc as soon as possible. Do Not Stretch It.
Nothing- This is the small lesion or inflammation that later leads to “All” as described above. With a chronic presentation of lasting discomfort in the lower leg, fascial adhesions are likely built up between the muscle and the fascia. The soft tissue modalities of ART and Graston Technique (tools pictured below) are the methods of choice for releasing those adhesions before they cause larger problems.
 |
With an acute onset PRICE is the rule here: Protect, Rest, Ice, Compression, Elevate. Remember that the P in protect may require you to Protect your lower leg from your ego and whatever achilles busting plans you had for it when you woke up this morning.